Implement appFabric caching service to build faster ASP.NET Applications with Windows Azure
Speed up Web Applications using the new Windows Azure AppFabric Caching service. This article will cover concepts, scenarios, and features of the Caching service through a sample code and demonstrations.
In a world where speed and scale are the key success metrics of any solution, they can’t be afterthoughts or retrofitted to application architecture. The Windows Azure AppFabric Caching service provides the necessary building blocks to simplify these challenges without having to learn about deploying and managing another tier in your application architecture. In a nutshell, the Caching service is the elastic memory that your application needs for increasing its performance and throughput by offloading the pressure from the data tier and the distributed state so that your application is able to easily scale out the compute tier.
The Caching service offers developers the following capabilities:
- Pre-built ASP.NET providers for session state and page output caching, enabling acceleration of Web applications without having to modify application code
- Caches any managed object—no object size limits, no serialization costs for local caching
- Easily integrates into existing applications
- Consistent development model across both Windows Azure AppFabric and Windows Server AppFabric
- Secured access and authorization provided by the Access Control service
Setting up AppFabric Caching:
To get started using the Windows Azure AppFabric Caching service, head to portal.appfabriclabs.com. This is the CTP portal that you can use to get familiar with the Caching service. It doesn’t cost anything, but there are no service level agreements for the service.
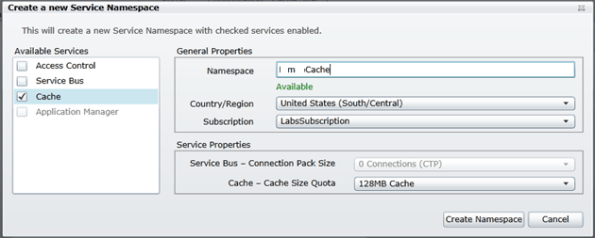
On the portal, select the Cache option and create a new cache by clicking New Namespace. The dialog box to configure the Cache service namespace is shown in Figure 1.
Figure 1 Configuring a New Cache Service Namespace
The only two options you need to specify are a unique service namespace and the cache size (of which you can choose between 128MB and 256MB in the CTP). When you choose OK the service will provision the cache for you in the background. This typically takes 10 to 15 seconds. When complete, you have a fully functional, distributed cache available to your applications.
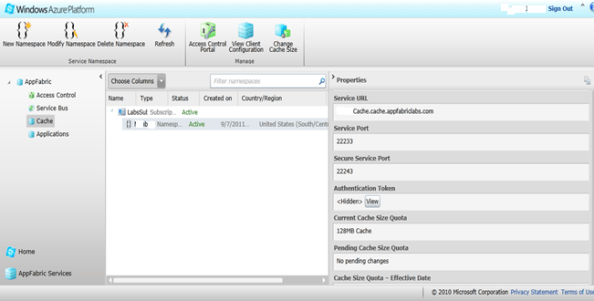
Now that it’s created, you can take a look at the properties of your cache, as in Figure 2
Figure 2 Cache Service Properties
You can see that we’ve created a cache using the namespace of <YourCache>. There are a few pieces of important information that you’ll want to grab, as we’ll use them later in our code: the Service URL and the Authentication Token. The Service URL is the TCP endpoint that your application will connect to when interacting with the Caching service. The Authentication Token is an encrypted token that you’ll pass along to Access Control to authenticate your service.
Caching in Your App :
Now, before you start coding, download the Windows Azure AppFabric SDK. You can find it at go.microsoft.com/fwlink/?LinkID=184288 or click the link on the portal.
To begin, let’s create a simple web application using C#. Once created, be sure to update the project so that it targets the full Microsoft .NET Framework instead of the Client Profile. You’ll also need to add the Caching assemblies, which can typically be found under C:\Program Files\Windows Azure AppFabric SDK\V2.0\Assemblies\Cache. For now, add the following two assemblies:
- Microsoft.ApplicationServer.Caching.Client
- Microsoft.ApplicationServer.Caching.Core
In the portal, select your cache, then click the View Client Configuration button. This opens a dialog that provides the configuration XML. Copy the XML snippet and paste it into your configuration file. The end result will look like Figure 3.
Figure 3 Client Configuration
1. <?xml version=”1.0″?>2. <configuration>
3. <configSections>
4. <section name=”dataCacheClient”
5. type=”Microsoft.ApplicationServer.Caching.DataCacheClientSection, Microsoft.ApplicationServer.Caching.Core”
6. allowLocation=”true”
7. allowDefinition=”Everywhere”/>
8. </configSections>
9. <dataCacheClient deployment=”Simple”>
10. <hosts>
11. <host
12. name=”YOURCACHE.cache.appfabriclabs.com”
13. cachePort=”22233″ />
14. </hosts>
15. <securityProperties mode=”Message”>
16. <messageSecurity
17. authorizationInfo=”YOURTOKEN”>
18. </messageSecurity>
19. </securityProperties>
20. </dataCacheClient></configuration>
In your web application Implement your code as per described in following example:
Private static DataCacheFactory dataCacheFactory ; // create object DataCacheFactory public List<string> Getvalidatecntmsg(int recGrp) { YourEntities objYourEntity = new YourEntities(); var msgList = new List<string>(); DataCache dataCache = dataCacheFactory.GetDefaultCache();//Get default cache msgList= dataCache .Get(“Message”) as List<string>; if(msgList!=Null) {//Check if data exists in cache and get data from cache return msgList ;} var query = from d in objYourEntity.per_stg_cnt where d.rec_grp == recGrp select d; msgList= query.ToList(); dataCache .Put(“Message”, msgList);//Put data in cache if not exists in cache return msgList;}You can see that all we have to do is create a new instance of the DataCacheFactory, and all the configuration settings in the Web.config file are read in by default.
As you’ve seen, you can manage DataCacheFactory in your configuration. While we’ve only performed PUT and GET operations on simple data, we could easily store data retrieved from SQL Azure, Windows Azure or another provider of data.
Now you will be able to build your Windows Azure applications faster to match increasing demand with increasing throughput by using Windows Azure AppFabric Caching service.
Sandip Shinde


It’s going to be finish of mine day, except before end I am reading this impressive paragraph to increase my experience.